SIMPLE TRACKING EXPENSES WITH GOOGLE SHEETS AND FORMS
Motivation
If you are not interested in the story about my unsuccessful start jump here
As a student, self-financing person I had a lot of ways where my money were dancing out of my pocket. I did want some easy way to better control my expenses.
First Thoughts
First of all, as a programmer my first idea was to code an app just for writing down and saving expenses. Problem was I didn’t know how to create android/iOS applications and in past I had only experience with creating web applications. Loading web page and interacting with the web app inside a mobile browser is not as good user experience as directly interacting with native mobile app on your android/iOS (or other phone). As I said, I was only experienced in web development. By the time, I didn’t know anything about PWA (Progressive Web App) and as I have later realized, interacting with web app in mobile phone doesn’t need to be such a pain as I thought.
I also have some experience with backend things such as Node.js, Express, Django, PostgreSQL, AWS solutions. On frontend it was mainly React. I immediately started to work on React App, installing all required packages, routes, redux, apollo. Then on the backend side express, graphql, postgres - also setupped docker for the easy database access.
A lot of ideas popped in my head. Really great UX, minimalistic design, great customization of charts, notifications, progress tracking, saving money strategy, tags for expenses etc.
Great start!
When you got the idea, there is a high chance someone implemented it already
My first intention was to easily and efficiently write down my expenses. As the ideas popped out my mind focused on accomplishing these little things for the app - fast app, great design, user experience, customization.
I knew there must be some finance app already implemented. I searched for these apps and I soon realized there are thousands of these apps. I checked for a few of them and was crushed of their look and functionality. They also came with the solutions on a problems I didn’t even realize can occur (for example currency and periodical income). I was quite demotivated, as there were another apps (and even web apps) I didn’t even want to visit as I thought it had no really logical reason to do.
The final nail in the coffin was when my bank came with the update in their app and implemented a lot of features I was planning to add to my “app”.
Back to the beginning
My purpose was to track my expenses. In the end, I was the person that want to customize the charts and all the things I would probably don’t need at all. I was designing something for someone who doesn’t even exist and who won’t use what I would create.

I don’t know where it came from but I got the idea I will track my expenses with Google Forms and Google Sheet. I have set up a new form, added form questions necessary for tracking expense such as value, category, tags, description. You can even request to upload photo (for example your receipt from shopping).
Go to https://docs.google.com/forms. If you are paranoid about google tracking you and your data, I have bad news for you - this way of tracking expenses is not suitable for you :( If you don’t have an account on google/gmail - sign up, and then go to the link above.
First step is simple. Create a new form. Don’t forget to give your new form some really nice name.

Now you should see your blank form. On the right side you have small menu panel with a few options. You need only first menu option - Add question

Now, what you add is really up to you but you can inspire and use the same question set as I’m using.
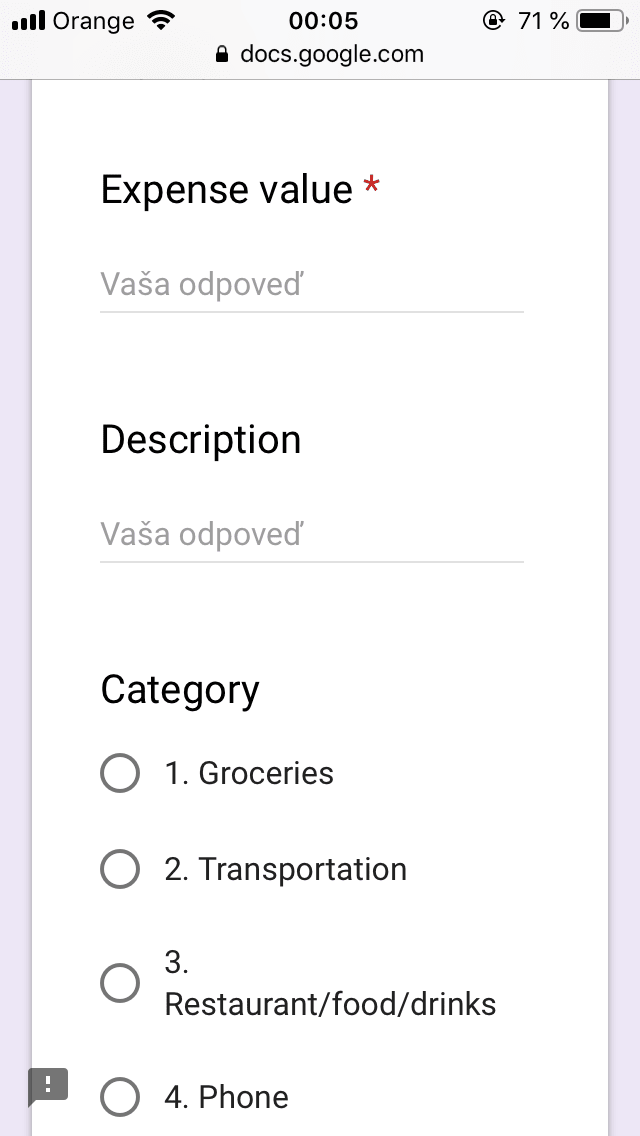
Step 1. - Expense value question asks you simple thing - how much money
did you spend. We set up question as ”short answer”.
Next below the input you’ve got some options. One of them is to set your
question as required. You always want to force yourself to fill up this
value, so it is pretty nice to validate if you actually fill this input. On the
right to the “required” option you have three dots option. Click on that icon
and select Response validation. Now next options popped up. You want to
choose validation by Regular expression, where value matches the
expression ^[\d]+(,[\d]+)?$ and when value doesn’t match specified
regular expression, then it will simply show message Only number such as 5 or 5,15 is valid number.
Why it can’t be 5.15 ? I will describe the problem later.
Basically, the regular expression is telling the google forms, what is a valid values for this questions. So it accepts digits and numbers, like 5 or 5,15. Easy.
In validation options, there is also option number validation. But it would accepts also number like 5.15, which we don’t want :)

Step 2. - Describe your item. For example “Bus tickets to NY”, “Groceries shopping”, “New clothes for party” etc.
This time, you just set question and short answer, nothing more.

Step 3. - Add category to your item. Here you can add whatever you want. My recommendation is to sort items in list by the frequency of item usage. You want most frequent have always on the top. So if you are going to restaurant every day, let restaurant be at the very top of your list to make yourself life easier.
My list is as follow:
- Groceries
- Transportation
- Restaurant/food/drinks
- Phone
- Cinema, theater, free time
- My own hobbies
- Rent
- Clothing

Step 4. (Optional) - Google forms automatically remember exactly when you filled up the form but in case you track an expense in another date, you can manually fill the date (when you paid for something).

Step 5. (Optional) - Do you want to save the photo of your receipt for some reason? It is possible to upload file! In this case, you want to upload photo.
At this question you can specify the file type - Choose Image, let another settings to be as they are (as well as on the screenshot below).

At this time you are done with the form. You can specify how much you spent, describe item, categorize and optionally set date when it happened and upload photo of your receipt.
Let’s Try The Form!
Click on preview.

And now you see your form. Fill it with random values or if you remember your last expense, fill it and Submit it. Now you should see 1 at Responses. It means you successfuly saved your first expense. Congratulation.
See structured responses data in Google Sheet. Click on Responses, and you will see Google Docs icon. Click on that.

Save it to your drive with whatever name you want. Click Create.

And after the moment, google will redirect you on the sheet page.

Wohoo! And you see your first value which you filled a moment back.
Edit and Warning
As I realized, there is no way to think about dot or comma in this way. There is a chance that you need to write a numbers with comma or with dot. It depends on the sheet's locale setting - which is by default set by the locale of your country (extracted from your browser settings). In my country we write numbers with comma, in your country it could be dot. If you are having trouble with this, see this link to gather more information. There is option to convert already existing dot-locale to comma locale. So don't worry too much about it.
Basically, you are done. Let me explain why I previously wanted to rule the number to be with ”,” instead of ”.” . Google sheet doesn’t recognize the number with dot. When it sees dot inside the value, it switch the type of cell to text. In the future, when you want to make statistics over your accumulated data, you could run into problems with that text value. However, now you are forced to write only valid values and you will be fine.
Make “App” from your Form (Iphone version)
Step 1. - Copy link of your form
Warning: Do not give this link to anyone. The person with this link can see and submit form.

Step 2. - Open in your safari browser
Warning: I don’t know how well is this feature supported on android phones. Iphones supports add webpage on desktop only in Safari browser. Chrome on Android phones should support this feature.
Step 3. - Open the link in your Safari browser (This one doesn’t need picture)
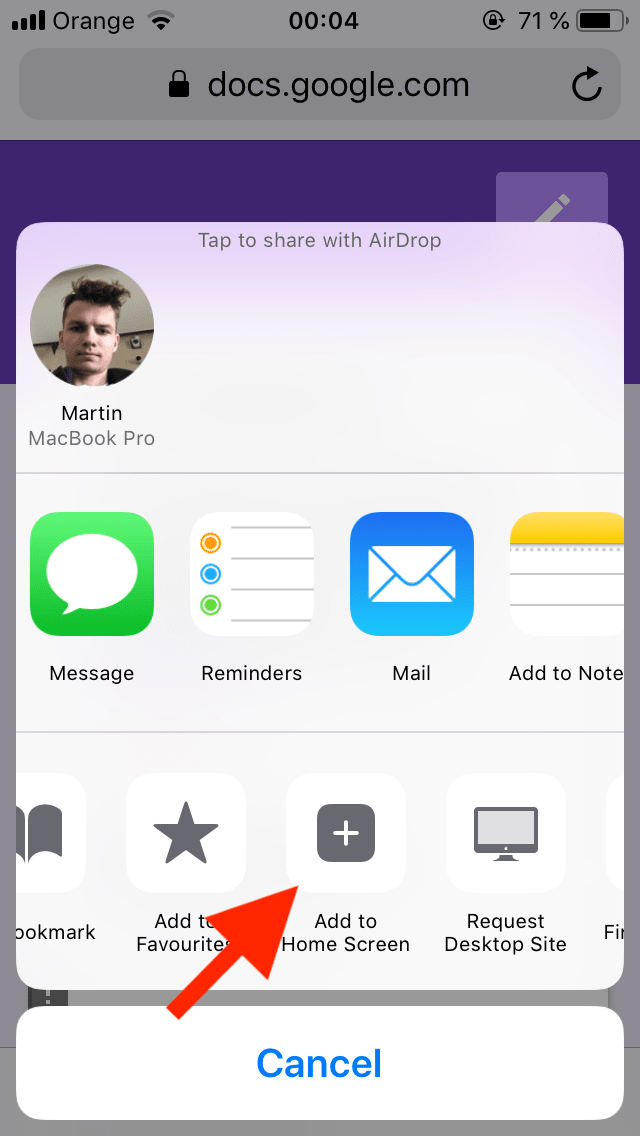
Step 4. - Click the share icon in the middle of Safari menu

Step 5. - Find Add to homescreen

Swipe and find Add to Home Screen option.

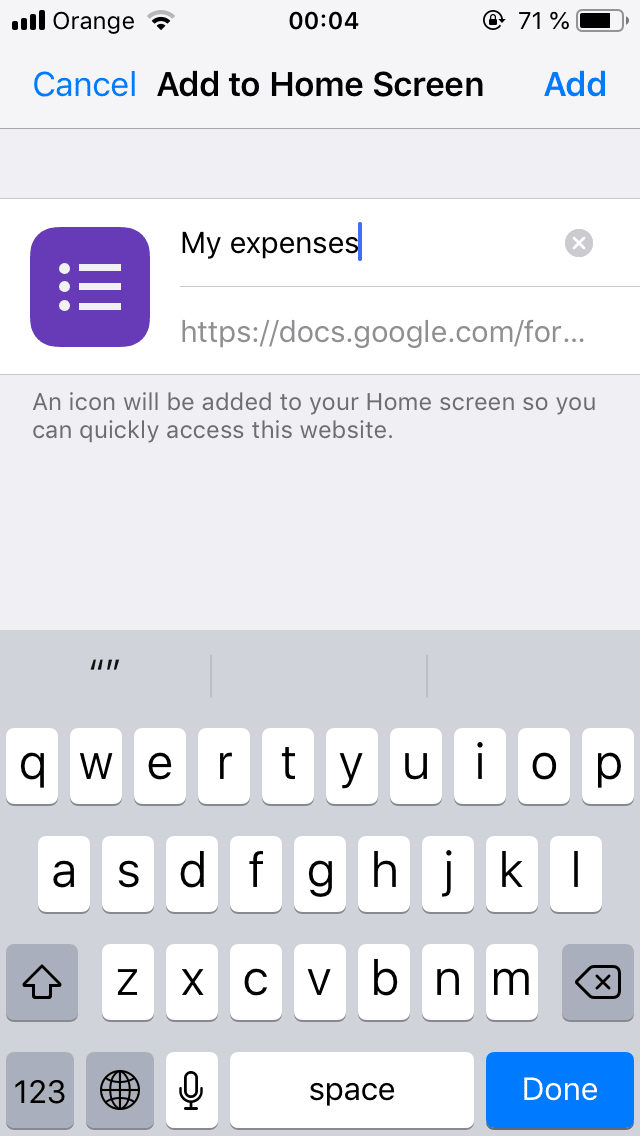
Step 6. - Give your “App” a short name - this name is show under the app.

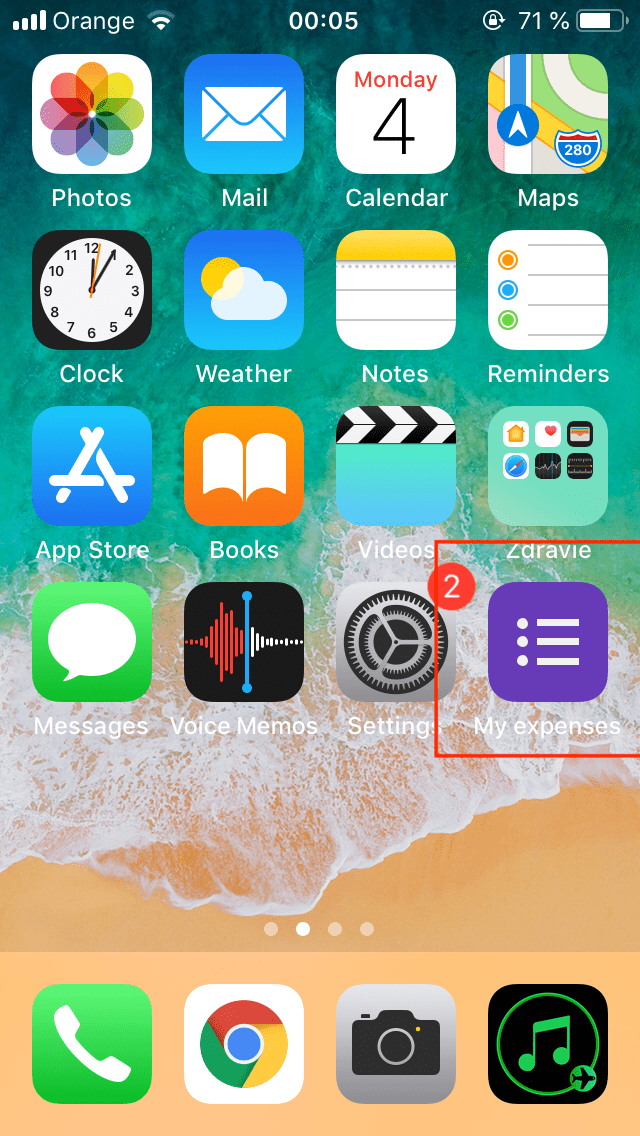
Step 7 - Finish, your link to the app is added to the Home Screen

When you click on the link, your form will be shown and you can interact. As soon as you pay for something, grab your phone, click on the icon, fill the form and submit.

Conclusion
Advantages
- Simplicity
- You (and google) and nobody else owns the data
-
Customization (good and bad)
- You can add to your form whatever field you like.
- You can compute another statistics from your accumulated data.
Disadvantages
- You don’t own the “App”
- You can’t sell it (or sell services to your customers)
- You can’t programme your custom functionality to the app
- Not so sexi at the native App.
Also take a look at part II. I will show you how I created some stats and charts for expenditures analysis.
You may also like
How to Make Useful Expense Charts In Google Sheets
In part one I showed you how to create a simple way to track your expenses. In this part I am going to show you how you can make some sexi…
How Should One Cut His Forest In Order to Last Him Forever
This is Jack. Jack is a man living in a cabin inside a small forest. He knows how to cut trees and how to take care of his small cabin. He…
So I've got Master's degree - Is the college really worth it?
Prepare yourself, chill out and read it happily while sipping out of your favorite tea or coffee. Don’t take the post too seriously but also…
